Below are the Targa 40 customisations I have made over the years:
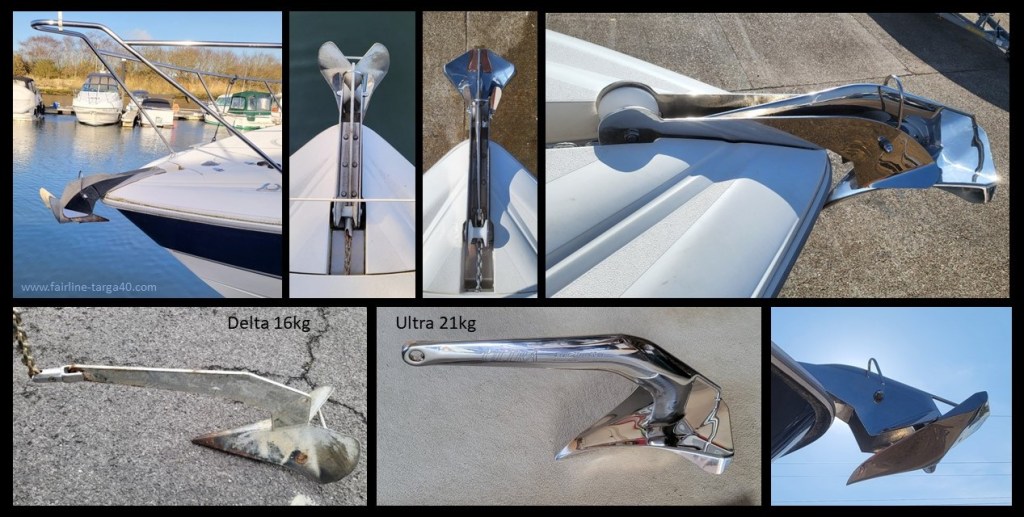
- Anchor upgrade. Having had some anchor drags with the factory fit 16kg Delta anchor, I posed a question on one of the Fairlane Owners site for others opinions and thoughts: https://m.facebook.com/groups/FairlineClub/permalink/1494494610960140/ Having followed up on replies and visiting Jimmy Green Marine in Seaton to see options, I decided on the Ultra 21kg with swivel and new 8mm chain (old chain not looking good after 22 years). It needed some welding SS dome as the roller near the chain locker needed to be raised, and some flaring of the fins where the anchor makes contact. I’ve also rigged up a trip line but that’s another story as there’s a lot of varying opinion on using these.
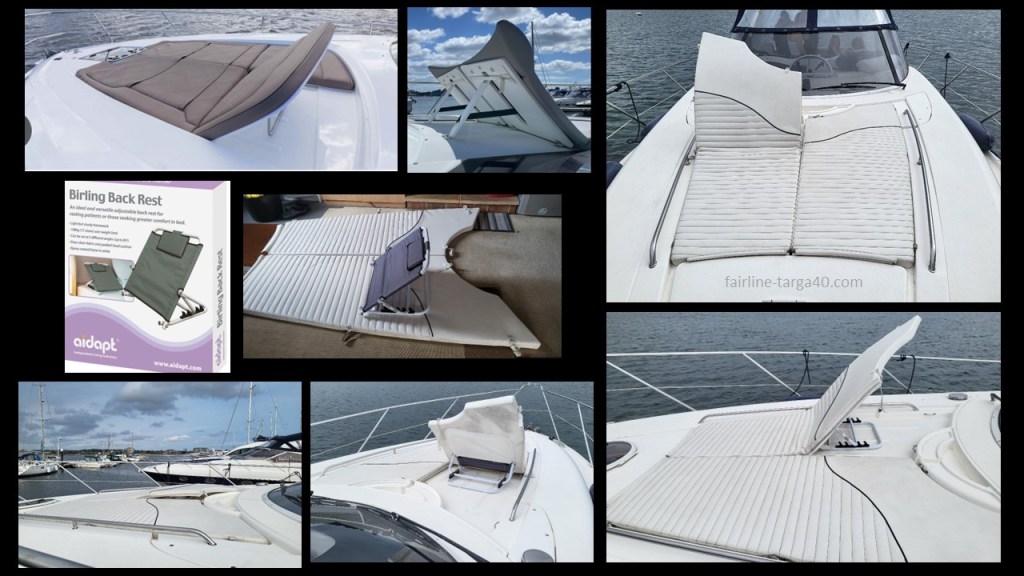
- T40 Coachroof Sunpad modernisation: So after mulling this over and some failed promises to look at the job professionally I went for a trial given my sunpad is old and will be replaced in the future. The aim was for a the current styling of reclinable sun loungers. Bit of research found these domestic bed adjustable back rests around £30; I bought one on offer for £20. I challenged my contact to replace the centre zip, with a shorter one to the recline level, so that each pad could be tilted independently and find a way of attaching the backrest to fit into a pocket on the underside of the sunpad and have two ties to stop it sliding around / slipping out. That way I could avoid any drilling into the coachroof GRP, can remove as needed and especially I was unsure how bulky it would be when strapped down with worst case scenario if it didn’t work there was no irreversible damage. A few weeks later it was made. Really pleased with the result so i’ve now bought another backrest. In the next year or so I will have a new sunpad made to improve the design; being thicker to have the mechanism inside, have the “sticky out bit” hinged to drop down behind and have an integral beer/can holder recess in the cushion. Plus whatever else might come to mind! Hope the pictures are self-explanatory.
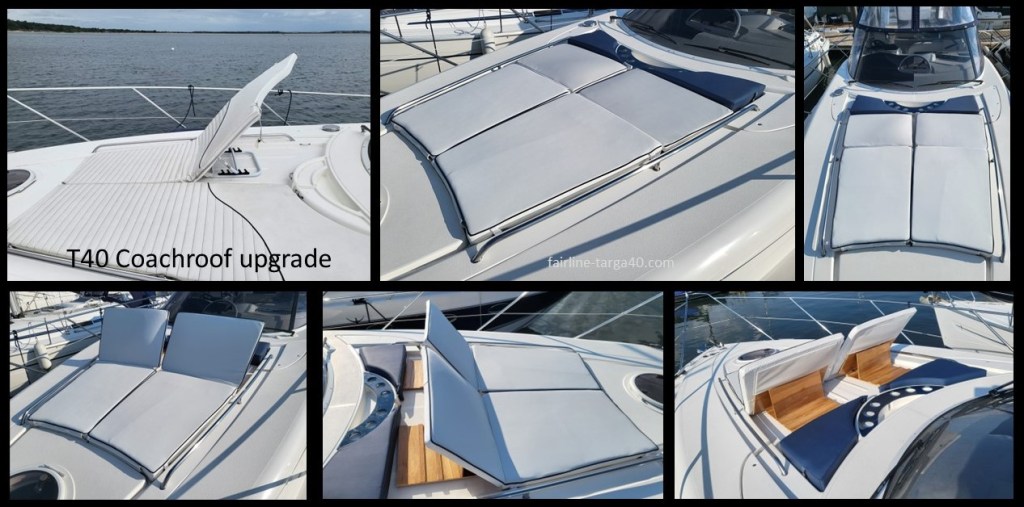
- May 2024. So working with Mark (Got it Covered, Poole) we worked on the final design. I didn’t like the curved head section, which went around the drinks holder, as it stuck out a lot. So keeping to the existing strap connections, a separate raised headrest in blue was fabricated leaving the rest of the sunpad in one piece that bent to form the seat / sun lounger. I worked up 9mm ply wood to copy the back rest angle I wanted, painted in epoxy (to seal and strengthen) and used SS hinges and small screws to complete. Really pleased with the outcome both functionally and aesthetically. The sun lounger has white/blue piping to match the cockpit re-upholstery and continuing the original theme.
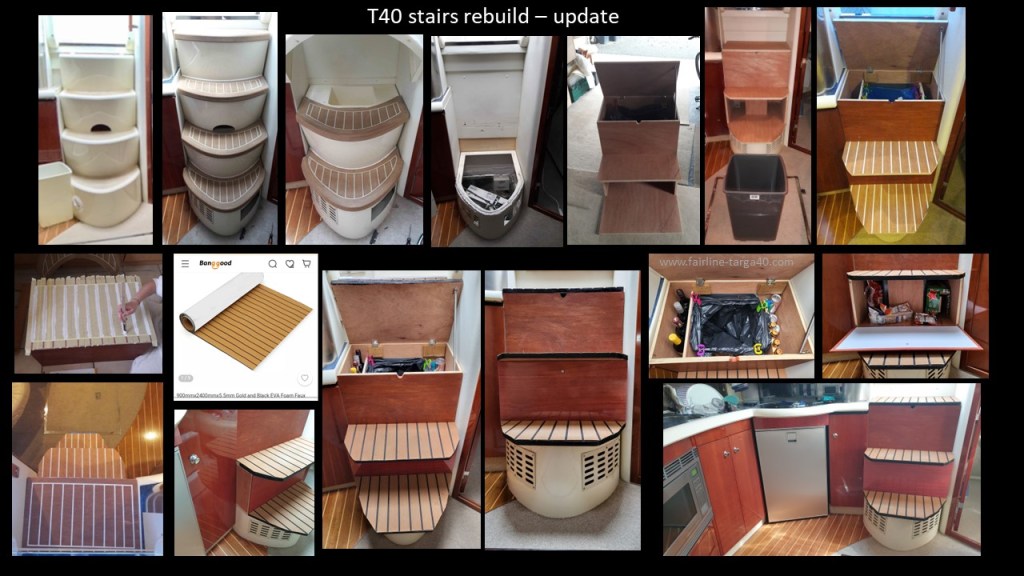
- Saloon steps rebuild: This follows on from the forum link below. One of the few flaws of the T40 was the stairs design. The 4 steps meant a step climb down and a very limited waste bin size and poor access. Annoying the T40 i acquired had fake teak steps bonded with lots of silicone meaning it was impossible to access the A/C unit in the floor under the stairs meant some destruction was needed to service it. Inspired by a PM with Jimmy the Builder forumite I worked on a design. Built at home and then refined over the last few years with padded veneer material on the steps, printed vinyl wrap to match the galley veneer, the 3 step design make it so much safer, I’ve a 50L waste bin with easy lifting lid, extra wine and tins storage at the side and further down a ‘nibbles’ section! All unscrews easy for A/C access. Just need to fine tune making the steps bit more curved and finishing the wrap.
https://forums.ybw.com/index.php?threads/fairline-targa-40-saloon-steps-rebuild.528908/
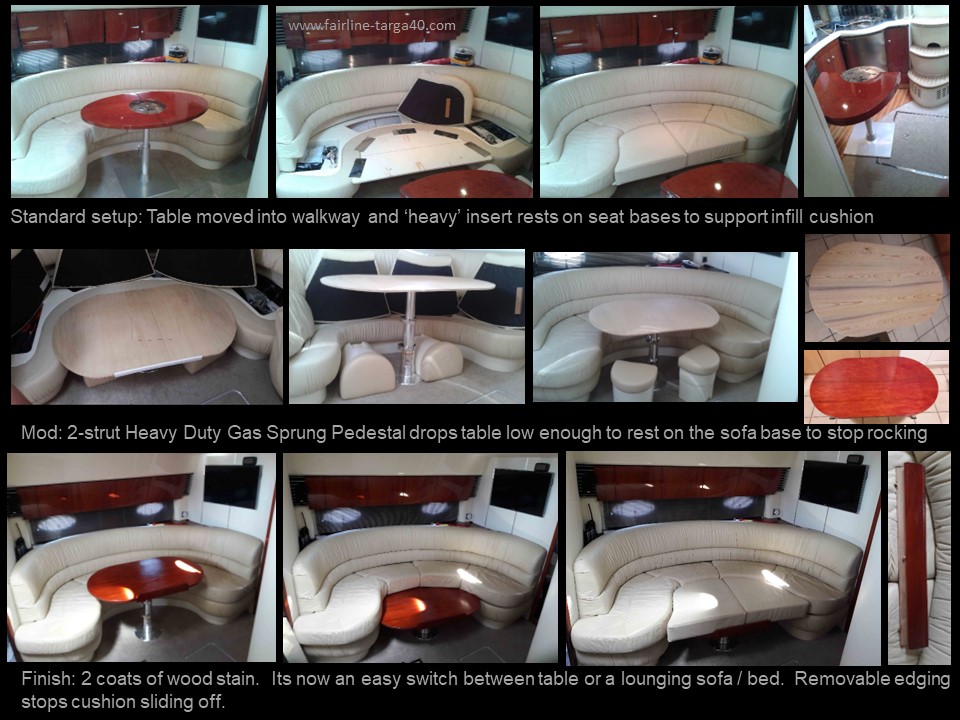
- Saloon Table / Infill Bed: This gives a better look at the process from my forum post. I was a little disappointed that the infill design meant having to move the table in the middle of the saloon/galley area. After an initial design without gaining support and stabilisation from the sofa bases i managed to get a symmetrical table to fit the asymmetric space. I have a local carpenter make the final version from some nice wood, that I stained, and he also made the clever removeable edging to limit the infill cushion sliding off. https://forums.ybw.com/index.php?threads/targa-40-%E2%80%93-saloon-table-infill-customisation-opinions-sought.451426/
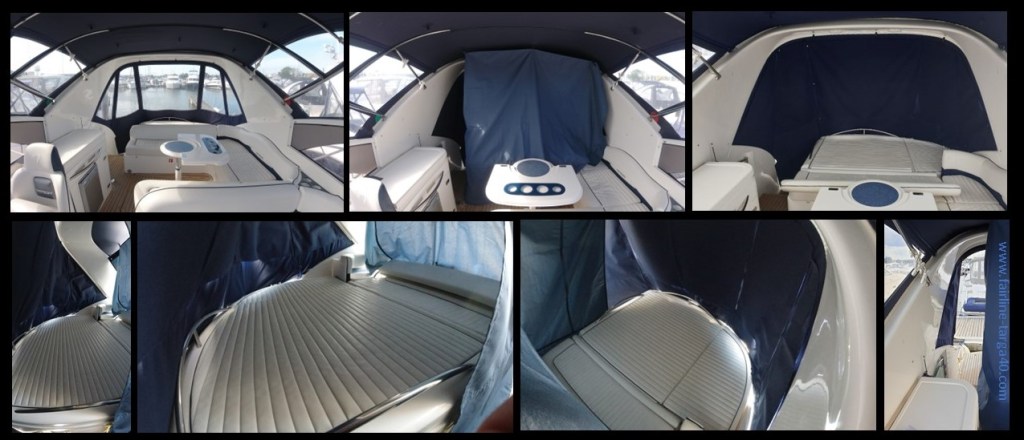
- Cockpit Berth. Given the sunpad is so good in the daytime I thought I could make better use at night time with extra guests are onboard. Based on tent designs a light canvas ‘wall’ was designed to clip to the bimini and in conjunction with blackout blinds provides a great 3rd ‘cabin’ big enough for two when the backrest is flipped forwards.
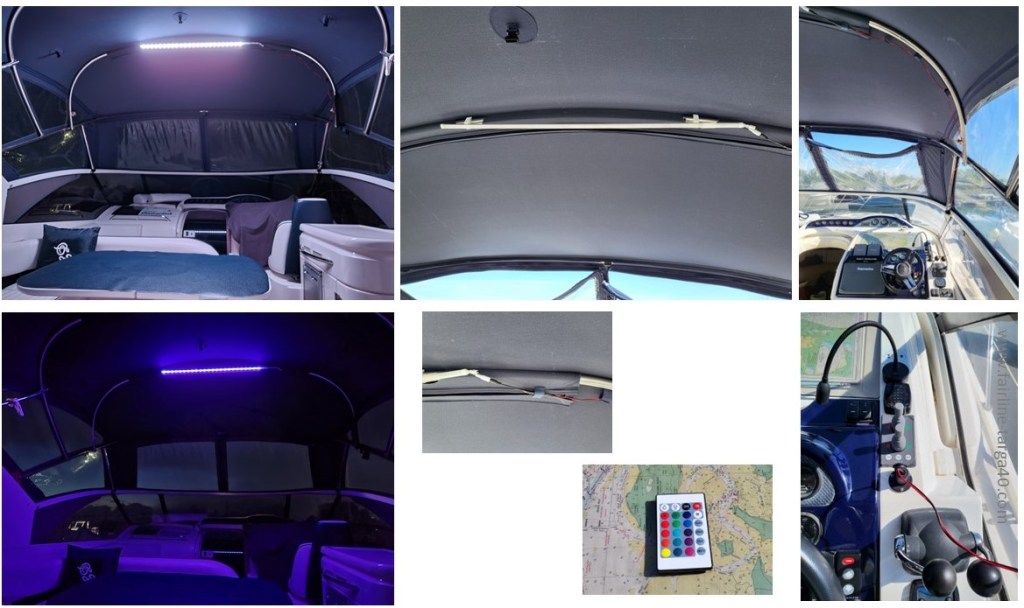
- Cockpit Lighting. The radar arch lights aren’t great at illuminating the cockpit so i made an LED setup very cist effectively. Basic but water proof LED strip lights, a LED diffuser unit and clips to the bimini frame and wire to the 12v supply. I have the canopy made with 2 spaces for the clips and some velcro straps for the wire. Easy to remove and install as needed and as bright or dim as you like with full range of colours and flashing!!
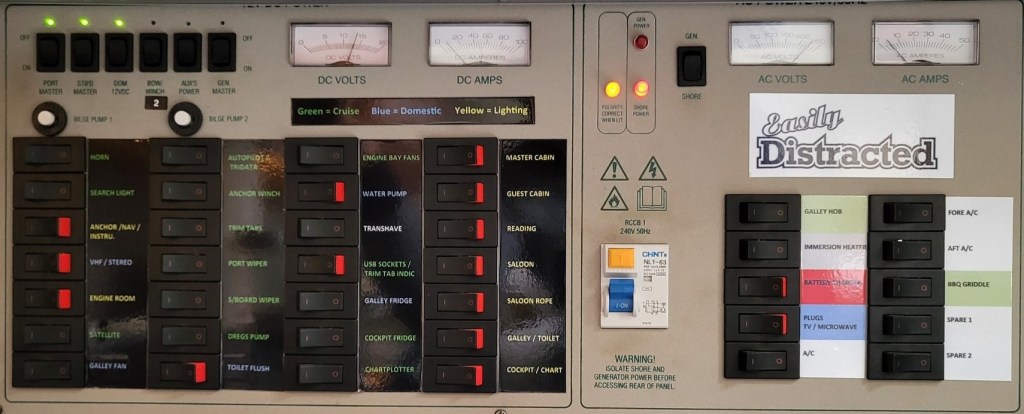
- Electrical Panel – With numerous addons over the years the panel was getting messy. Had these printed as one sheet of A4 waterproof vinyl and I cut to fit costing around £15. Colour coding makes it easier to switch on as needed without having to think too much.

- Stern Gate – Inspired with new boats having a bit more to their gate designs I added a vinyl Fairline badge. Two were made to fix from the inner aspect and then second onto the reverse of the first to keep the stripes going the same way!
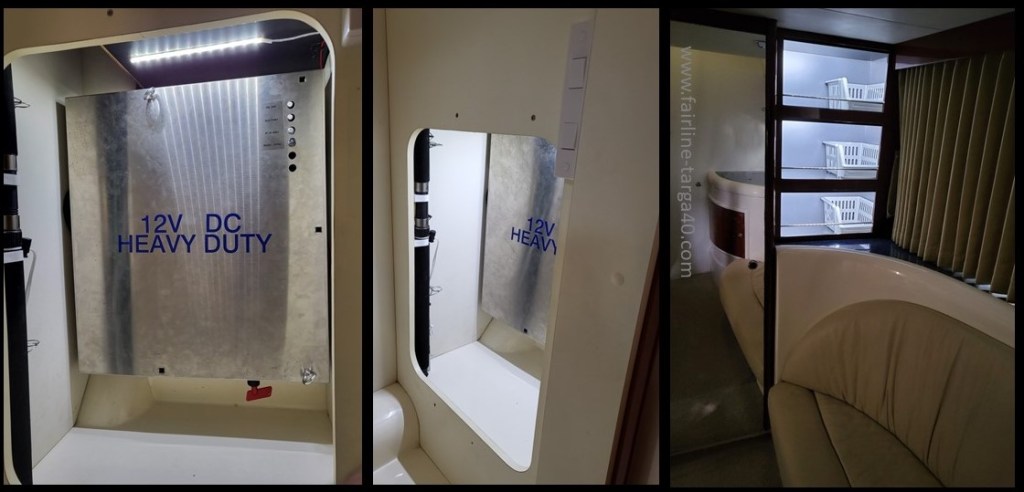
- Aft cabin stowage and wardrobe. Seeing the heavy duty box with a torch was always a PITA so whilst doing the wiring I took the opportunity to add some (non expensive but) fancy lighting for the stowage lockers. Whilst you cant see them there is an inch plastic strip painted black to fully block direct vision of the LEDs. Single LED strips are superb and wired into the domestic feed. There is an inch gap after drilling through on the left side of the lockers and dropped the wires down to the metal cabinet. A simple double socket on/off switch.
— The Fairline Targa 40 website —
